


I have just completed my fieldwork and I’m looking for interview transcription services. I recorded the interviews using the Olympus VN-7200 digital voice recorder. How do I get them to you? Thanks – Maggie.
A recent email from a researcher. And it’s not the first one.
If you have recorded your research interviews using the Olympus DP-201, Olympus VN-7200, or the Sony ICDB600 digital recorders, transferring your audio files to your computer is not as easy as copy and paste. Because these digital audio recorders don’t have a USB interface (here are some voice recorders we recommend for recording research interviews), you have to record the files to your computer. And that’s a time consuming and tedious process.
Luckily for you, if you’ve already bought this recorder, this post will walk you through the process of transferring the audio files to your computer. I’m going to share with you 2 ways you can transfer audio files from the Olympus VN-7200 to your computer. The first method is easier and if you’re not tech savvy, this is the method I recommend you use. The second method is for those of you that know your way around computers and consider themselves tech savvy. In any case, if you try the second method and it does not work, try the first method.
NB: This is a time consuming process. You’ll need time to transfer the files. If you have 10 hours of audio interviews on your Olympus VN-7200 digital voice recorder that you need to transfer to your computer, you’ll need at least 10 hours to transfer the files. Here’s a great tip, if you have a lot of audio interviews, set the continuous playback option on the Olympus VN-7200 to ON (Press and hold the Display/Menu Button. Press the + or – to move to menu item 7. Use the fast forward or fast rewind button to select the ON setting. Press the OK button set the continuous playback setting to ON). With that setting set to ON, the Olympus VN-7200 will play all the files in the folder until the last file and then stop.
How to Transfer Audio Files from Olympus VN-7200 to Your Computer
Method 1: Transfer to a Voice Recorder with USB

First this is what you’ll need.
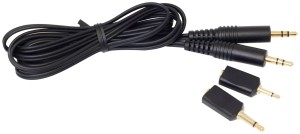
- 3.5mm male to male audio cord, also known as 1/8 inch male to male audio cable. You can get one from your local electronic store or order this one from Amazon.com
- You’ll need another digital voice recorder, I recommend you get the Sony ICD-UX570, the best voice recorder I own (here’s my review of the UX570). But you can get any other digital recorder, just make sure it has a built-in USB interface.
The Steps.
Step 1: Connect the Cable


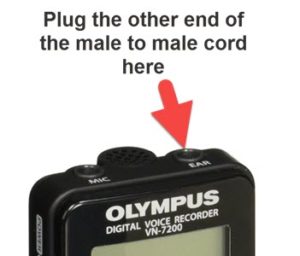
Connect the 3.5mm male-to-male audio cable to both recorders. It is important that you insert one end of the cable into the ear (aka stereo/headphone) jack of the Olympus VN-7200 digital recorder and the other end into the mic jack (colored red) of the Sony ICD-UX570. Both ends of the male to male cable are identical, so it doesn’t matter which end goes where.
Step 2: Record the Audio
Hit the rec button on the Sony ICD-UX570 and then press Play on the Olympus VN-7200. It’s important that you first press the rec button on the Sony ICD-UX570 before pressing the Play button on the Olympus VN-7200 or you’re likely to lose some of the recording.
Step 3: Stop the Recording
Once the recording has played to the end on the Olympus VN-7200, hit stop on both audio recorders. The Sony ICD-UX570 will automatically save the file.
Step 4: Transfer to Computer
Connect the Sony ICD-UX570 to your computer via the built in USB and copy and paste the files to your computer. That’s it.
The advantage of this first method is it’s easier than method 2. The cons are you’ll need to get the Sony ICD-UX570, but that’s actually a good thing! You do need to replace the Olympus VN-7200 with a recorder with a built-in USB. That’s the long-term solution.
Method 2: Transfer Directly to your Computer
For those of you who are more tech savvy, you can record the audio directly to your computer…
First this is what you’ll need.
- 3.5mm male to male audio cord, also known as 1/8 inch male to male audio cable. You can get one from your local electronic store or order this one from Amazon.com. Newer laptops don’t come with a separate mic and headset 3.5mm jack: you might need an adapter. More on that below.
- You’ll need an audio recording/editing software. I recommend Audacity. It’s a free, easy to use software. It’s has Windows and Mac versions.
The Steps.
Step 1. Connect the Cable
Connect the 3.5mm audio cable to both the recorder and the computer. The transfer from your Olympus VN-7200 to your computer is only going to work if the connection is right. You need to insert the cable into the ear (aka stereo/headphone) jack of the Olympus VN-7200 digital recorder.
Then insert the other end into the mic jack of your computer or laptop. Both ends of the male to male 3.5mm cord are identical. So it doesn’t matter which end you use, provided you plug in the cable into the ear or headset jack on the recorder and the mic jack on the computer. The headset jacks are either green or black on most computers/laptops and mic jacks are either red or pink.
Newer laptops don’t come with a separate mic and headset 3.5mm jack. They only have one input that serves as a mic and headset jack. Depending on the make of your laptop, plugging the male to male cable into the jack might work, mostly on PCs. If it doesn’t, you will need an adapter, (if you’re using a PC- get this one from Amazon, if you’re using a Mac – I couldn’t find a splitter to recommend. I suggest you hop in to your nearest Apple store and explain to them what you need. Apple use a different standard for their 3.5mm jack, so most generic adapters won’t work…and new Apple laptops no longer have a 3.5mm audio jack! If you are Mac user and find a cable that works, please let us know in the comment section).
Once you have the right adapter, insert the adapter into the laptop and then insert the male to male cable into mic jack of the adapter.
Step 2. Launch Audacity
As I mentioned earlier, I recommend Audacity as the recording software of choice. This is because it will also enable you to edit the recording once you are done. If you have a minute or so at the start that you recorded as you set up, no worries, you can use Audacity to chop that off.
Once Audacity is open, you need to select the appropriate microphone to record from. Again the choices you have depend on the hardware and audio drivers that are installed on your computer or laptop. On my machine, see image below,

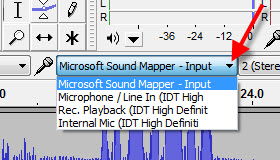
I have 4 options and the Microsoft Sound Mapper-Input works for me. Try the different mic input options on your computer/laptop until you get one that works for you. Also, you can increase or decrease the mic input level


using the mic input slider.
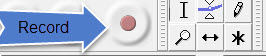
Once you have selected the microphone input and level, click on the record button. Audacity starts to record but since there is no input (yet) from the Olympus VN-7200 recorder, you’ll only see a straight waveform…

Step 3. Record the Audio
Once you’ve started a new recording on Audacity, hit the play button on the recorder. Remember Audacity enables you to easily cut out any dead spaces in the beginning and at the end of the recording so you shouldn’t worry about synching the recording process. You should now see a variable waveform on Audacity at it records the input from the recorder. If you don’t see a variable waveform, stop both the recorder and Audacity and try a different microphone input or increase the mic input level – see step 2.
Step 4. Stop Recording, Save
Once the recording has played to the end on the Olympus VN-7200, hit stop on the audio recorder and Audacity (or any other recording software you are using). First save the file and then make edits to it. For instance, cut off the dead space at the beginning and end. The best format to use to save the file is the mp3 format.
A few tips when using this method. Make sure to do a few trial runs to make sure that everything is working fine. Record a minute or 2 and then stop the recording, save and listen to it on your computer before you record all of the interviews. If it does not work, 90% of the time will be you have the wrong mic input, you have not correctly connected the cable, or the input level is very low. Go back to step 1 and 2. If all else fails, try the first method.
Transferring audio from VN-7200 to your computer is not an easy process. I hope this post helps you and if you have any questions, post them in the comment section below and I’ll be sure to get back to you!