

Weloty’s NVivo Transcription Service offers 3 types of transcripts that you can import into NVivo. Transcripts formatted with heading styles are our default and most popular NVivo transcription format. For those of you who plan to use NVivo to analyze their interviews and or focus groups, this video is a step by step guide on how to auto code header formatted transcripts in NVivo 11. If you’d like us to transcribe your interviews and or focus group discussions using the NVivo heading styles format, which eliminates an enormous amount of work for you, please get in touch.
Transcript
In the previous video, I showed you how to import a header formatted transcript into NVivo 11. In this video, I’m going to show you how to segment the transcript using the auto code feature in NVivo 11.
Now, I wish to code everything that the interviewee said into a node. Why? Well so that I can easily explore what they said, make comparisons, add case classifications and run matrix queries. Let’s begin.
Auto Coding Header Formatted Transcripts
So here we have the transcript that we imported in the previous video. There are 2 ways to access the auto code feature in NVivo 11. The first way, you can click on analyze and click on auto code. An alternative way is just right click on the transcript and click on auto code.
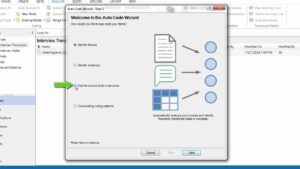 The first step is to select how we’d like to auto code the transcript. And we are going to auto code the transcript using the source style or structure. That is the heading styles that we applied to the speaker identifiers.
So we select use the source style or structure. Next. Then we are going to use the heading style that we applied to the speaker identifier. And the heading style is Head-NVivo. Select it. Go to next. We are going to code the speaker identifiers into a new node. So you create a new node. You’re going to give the name of the node as, the name of the company inkling. And that’s it. Click on finish.
Now, if we go into our nodes. We have created a new node. And inside it, we have everything that Matt said. And Matt is the interviewee. 82.88% coverage. Which is good. You always want your interviews to have at least 80% of the interviewee speaking. Then we have what the interviewer asked. Double click, and these are the questions. And the comments they made during the interview.
Creating a Case Node
Let me quickly show you how powerful the auto code feature is. I’m going to create a case node for Matt. To do that, all I have to do is just click on Matt. Right click. Create as, create a node. Cases. I want to create a case, and a case is a unit of observation. And we are going to name it Matt. No description. I’m not going to color it. Attribute values. I have created a classification for this. The interview classification and I’ll show you how to do that in a little while. So male, Matt is male. And he is less than 30 years old. Okay.
Creating a Case Classification and Word Frequency Query
So how did I create the classification? I went to create and then I clicked on case classification and I created a classification. So now if we go to our cases. And we have a case for Matt. Let me do quick word query on everything that Matt said. And for that I’ll go to query, and I’m going to do a word frequency search, and I’m going to select items. And I’m going to go to cases. Matt, select. Okay, and run query.
So here is everything that Matt said. Let’s see the word cloud. There we have it. So here is the word cloud for Matt. As you can see people and company are pretty big, so I’d very much like to see what‘s the intersection between people and the company, as a theme. So running a quick word frequency query, tell me a lot of what is going on during the interview.
All right, so that’s it for this tutorial. Please check out our website when you have time, and have a good day.