

What gives transcribers nightmares?
= Research interviews and focus groups recorded in a noisy location.
And that’s because researchers expect us to perform miracles and turn poorly recorded data into immaculate transcripts. We don’t like disappointing our clients, but we’re not magicians! More importantly, is a concern for the validity and reliability of data collected; recording high quality audio not only allows your transcriber to have a good night sleep (lol), but also improves your research’s trustworthiness.
That’s the main reason I blog: to assist researchers collect better qualitative data and make their research project a success. Yes, I’d appreciate it if you’d hire us to transcribe your interviews and focus groups, but that’s a bonus. I want you to record valid and reliable data.
A Few Tips on recording Interviews in a Noisy Environment.
Please Don’t
The first tip may seem counter intuitive: don’t record your research interviews in a noisy location. This is one tip that’s sure to improve the sound quality of your recorded research interviews. Yes, I realize this is a how-to post on recording interviews in a noisy location, but it does need to be pointed out that you’ll get a better audio recording if you choose a quiet location to conduct your interview(s).
But, perhaps, more importantly is to try and reduce the noise in your location. For instance, if you are recording in a café, choose a table that’s far away from the barrister, not directly below a speaker blaring the latest top 40 hit (or Alanis Morrissette’s “Ironic”). You can also choose to record the interview when the café is less busy.
My point is, try as much as humanly possible to think of ways of reducing environmental noise at your interview location. No amount of preparation, equipment, post editing, or tips will make the noise magically disappear. So, try to be creative in looking for ways to reduce background noise – it will immensely help you record better quality audio interviews.
Over Prepare
Benjamin Franklin famously said, “By failing to prepare, you are preparing to fail.” Sounds cliché, but holds true for recording interviews in a noisy location. You are going to encounter a lot of unknowns, and you must be prepared.
Let me share a couple of ways you can prepare for the interviews.
1) Know your equipment. Your first interview shouldn’t be the first time you switch on your recorder or attach a clip-on mic. Find a willing “guinea pig” and do a test interview recording.
2) Visit the location. This is a must do. Visit the restaurant/café and get to know the waiters/management – they might be willing to lower the background music, switch off the fan that’s next to your table, and divert boisterous teens to a table further away from your interview. Regardless of the location, knowing what to expect will allow you to record better audio.
Those are the top 2 tips on recording interviews in noisy locations, I do have more but this is not a “tips” post – maybe I’ll pen one (if you want me to, let me know in the comment section below). Let’s look at the equipment that you are going to need to record interviews in noisy places.
What You’ll Need
- A good digital recorder will enable you to record high quality audio. The Sony ICD-UX570, is the recorder I recommend. You can read my review of this awesome recorder here.
- Clip on Microphones. You are going to need at least a couple of clip-on microphones. These are also known as lavaliere microphones, tie clip microphones. I recommend you get the Giant Squid (Amazon Link) clip on microphone; you can find more information on why I love these here. For 1-on-1 interviews, you are going to need 2 of these, one for you and one for the interviewee.
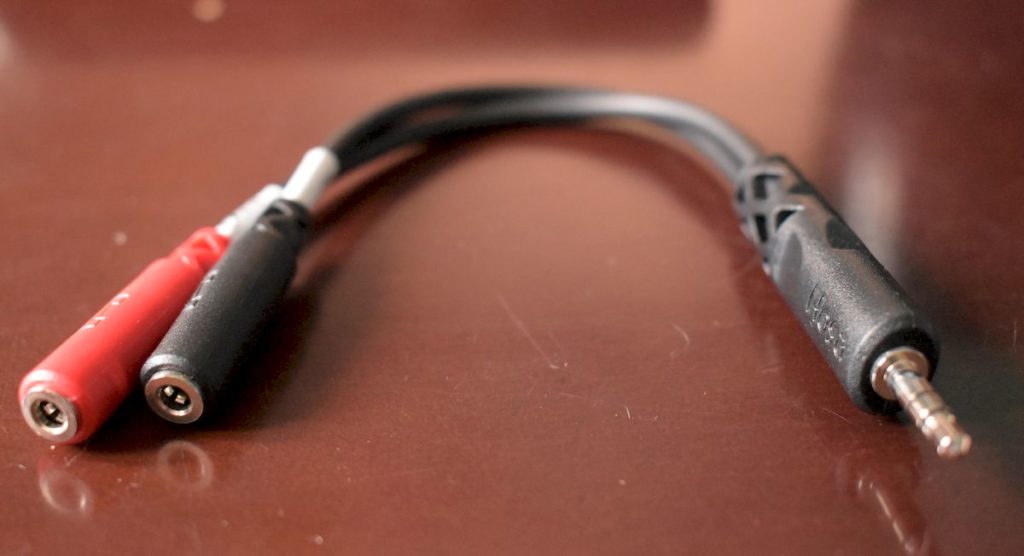
- Stereo to Mono splitter. A 3.5mm splitter is going to enable you to record the audio from each mic into a separate channel – left and right. I’ve used the Hosa splitters (Amazon Link) and they are great. For 1-on-1 interviews you’ll only need one. More if you are interviewing multiple participants simultaneously. And I’d recommend you always have a few spare splitters with you.
- Fuzzy windscreen. If you are going to record outdoors, these are a must have. Believe me, they do a wonderful job of reducing wind noise. Most clip-on microphones come with foam windscreen, they don’t work as well reducing wind noise. My recommendation: get these (Amazon Link).
- You’ll need these to monitor the recording. I usually use my phone’s earphones. They work great. No need for studio headphones.
Step by Step Instructions
Step 1: Attach the Clip to the Lavalier Microphone
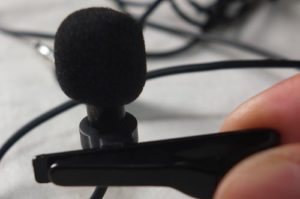
Now, most clip on mics come with a metallic crocodile/gator type clip. And that’s what you are going to use to clip on the mic to a shirt, t-shirt etc. You can also use a safety pin or masking tape to attach the microphone. But I’ve found the metallic clip that comes with the lavalier mics works great.
When attaching the clip to the microphone, you’ll want the clip on the inside, closer to your body and the mic away from your body. You also want the handles of the clip to stick out to the right. That’s because most respondents are right handed. For left handed respondents you’ll want to reattach the clip to the mic to make sure that when attached the clip is on the inside and the mic on the outside. Making sure the mic is on the outside reduces rustling noise when you and your respondent move around.
Step 2: Attach the Microphones
This is probably the most difficult step in recording interviews in a noisy location. You’ll need to attach the clip on microphone onto you and your interviewee. And there’s a right and wrong way to attach clip-on microphones.
Having said that, I’ve found that showing your respondent how to attach the mic to their clothing gets rid of all the awkwardness of invading their personal space.
Hand them the microphone and while attaching your microphone, show them how it’s done. The best place to attach the clip on microphone is the center of the chest; the sternum. Aim not too far up or down the chest: right in the middle is perfect.
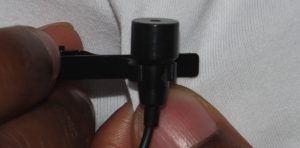
Shirts are perfect for attaching clip on mics. T-shirts are a bit more difficult. Pinch the t-shirt with your left hand and create a good sized crease to attach the mic. If you can’t get a good grip and find that the mic is flopping around, you can attach it to the t-shirt collar. Not the perfect position, but’s it’s better than having the mic flop around and create rustling noises.
To summarize, 1) when you attach the mic to the clip on, make sure the clip does not press the mic against your body. The mic should be on the outside, preferably not in contact with your shirt or top. 2) Try and attach the mic at the middle of the chest.
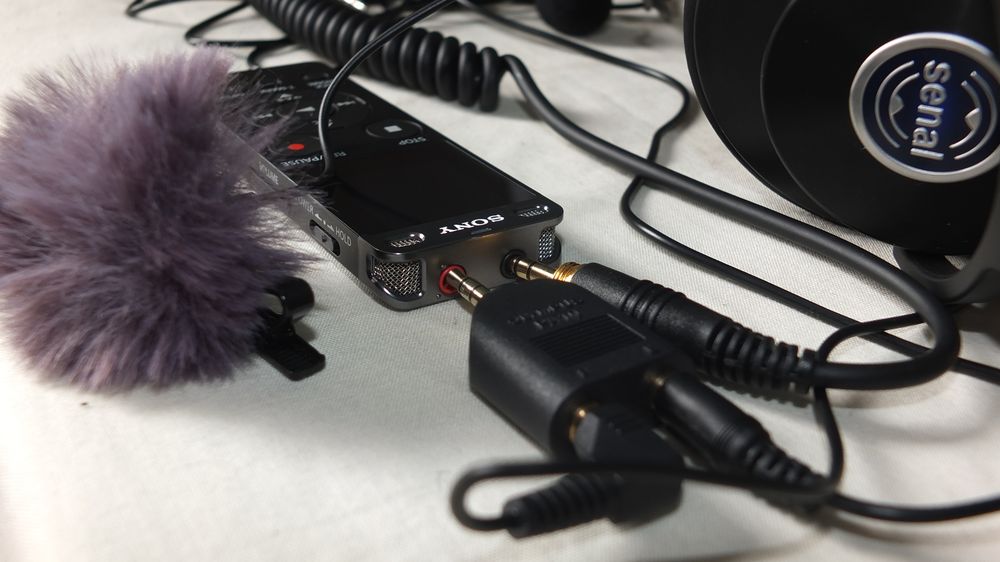
Step 3: Connect Microphones to the Splitter and Recorder
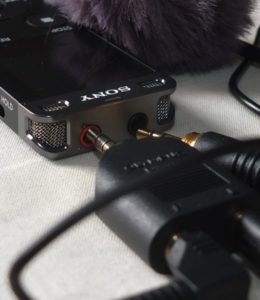
Once both of the mics have been attached, it’s time to connect them to the stereo to mono splitter. This is relatively easy. At the other end of the mic, there’s a 3.5mm plug. Attach each of these to the splitter. It doesn’t matter which mic goes where, but I do like to make a mental note of which channel, left or right, I’ve connect each of the microphone. Comes hardy in step 4 when I’m monitoring the recording.
Then, connect the splitter to you digital recorder. You’ll need to connect the splitter to the mic-in 3.5mm input. On the Sony ICD-ux560, that’s the red input. Plugging it into the headphones mic is probably the only thing you can do wrong in this step.
Step 4. Do a Test Recording
You are ready to do a test recording. Attach your headphones to the Sony ux560, and hit record. You should hear yourself on one side, either left or right and your interviewee on the other. If you noted which channel the microphones were attached to during the second step, then you can easily tell if both of the channels are recording.
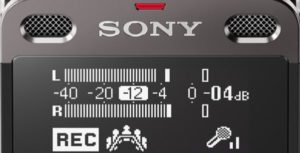
The Sony UX560 has visual meters, for right and left channels, that you should use to monitor the recording. Once, you’re sure that you are recording audio from both channels, use these meters to makes sure that the audio picks at around 12dB. Right at the middle. Anything more than that, you are probably also recording some background noise.
From personal experience using the Giant Squid microphone and the Sony ICD-UX560, I’ve found that setting the external mic sensitivity to low achieves this. I recommend that you use that as your default recording setting and you’ll capture very good sound without too much location noise.
Step 5. Record your Interview

Once you have made sure that everything is working great. It’s time to conduct the interview. I suggest you stop the test recording and start a new recording. Your interview will be recorded on a new file. But you can also segue to the interview and cut out test recording, and other chit chat, in post editing.
As always, you’ll want to record the interview using the LPCM 44.1kHz format on the Sony UX560. That’s it for this post. I hope you’ve found it useful. If you’ve got any questions, please post them in the comment section below. All the best and please keep us in mind for all of your academic transcription services needs.
Bonus Video:
Thanks for the post. Note: Link to fuzzy windscreen is empty
My apologies, I’ve updated the post with appropriate links.
All the best.
Hi! I can’t access the link to the audio splitter. Also, for the lavalier mics, do you recommed TRS or TRRS? Thanks!
Hi Alena, thanks for the catch. I’ve updated the post.
When using a voice recorder, I always recommend TRS mics. Here’s a great post on why, with 3 recommendations for lav mics.
All the best.
Isaac
Isaac…. re “What you’ll need” #3, please specify which spitter you recommend… there are a couple shown. John
Your advice / help is much appreciated.
Get the Hosa YMM-261. Very good splitter.
Miraculously, the splitter arrived within a day… Does it matter which Giant Squid headphone is plugged into Red / Black ports?
No, it doesn’t matter. But you do need to keep note of which mic is plugged where so that you can easily monitor the recording…
What if both the interview and interviewee are mobile?
They are on a mobile phone or in motion?
The Giant Squid microfone is not available. Are there other micros aou would recommend?
Elisabeth, I just did a quick check on Amazon and it is available. I’ll add a direct Amazon link to the product in the post.
Alternatives, I have a detailed post on my recommendations for clip on microphones.
Penned it a few years back, may need to update…
Thank you Isaac for your answer, but the link leads me directly to amazon Germany and says that it is not available. So I’ll try lavalier micro made by Sony
Yes, they are only available on Amazon.com. But you can also get them on their site and they ship worldwide.
The Sony lav microphone that I have is a stereo microphone and has a lot phasing issues – when you turn your head to the right or left you get a varied input that makes transcription harder.
I found the Olympus ME-15 (don’t know if it is available in Europe) to be a better option, though then audio quality was not as good as Giant squid.
In fact, listening to the audio recordings, it was hard to distinguish between the cheap 3 mics for $5 and the more expensive branded ones (the giant squid was the exception). So, if you can find those cheap no brand lav mics, they are more than adequate for research interviews.
Hope that helps.
Thank you very very much for your recommandations, so helpful!