
If you plan to use the Sony ICD-ux560 to conduct your research interviews, what are the 4 how-to’s you should learn before you conduct your first interview?
1. How to Store Your Recordings
Qualitative research projects produce a lot of data, you’ll need to be organized or the data will overwhelm you. And this tends to trip a lot of researchers. They “lose” recorded interviews, or can’t find them. If you record all your interviews into one folder and don’t take time to rename them to meaningful names, it’s going to be very difficult to find a specific interview recording.
With the Sony ICD-ux560, you’ll have a choice of whether to record and store your interview recording on the 4GB internal memory or an external microSDXC card. The advantage of external memory is you’ll get more storage capacity and it’s a more robust storage for your research interview recordings. So that’s the first choice you’ll need to make, internal or external memory.
Regardless of your choice, you’ll also need to designate a recording folder so as to use internal or external memory as your storage location. You cannot choose a storage location without designating a storage folder. You can use one of the default folders that come with the recorder, but I strongly recommend that you connect the recorder to your computer and create a folder structure that’s meaningful, and keeps you organized.
By default, all recording are stored in a folder in the the REC_FILE folder on the internal memory and external memory on the Sony ICD-ux560. On your microSD card, you’ll find the REC_FILE folder nested in the PRIVATE>SONY. If you can’t find these folders in your SD Card, format the SD card using the recorder.
Now, (using your computer) you’ll need to create folders in the REC_FILE folder for you to use them as recording folders. A good way to organize your recording is by your unit of observation. So if you are conducting 1-on-1 interviews or focus groups, create a folder for each of your interviewee or focus group.
“Jake Interview”, “InterviewMary”, “FG-1”are all these are possible folder names. And you’d set this folder for all the recordings that are related to the interview with Jack, for instance pre and post interview observations. Please note that even if you create another folder inside the Jack Interview folder, it’s not visible to the recorder.
To set your recording folder, go to Settings>Recording Settings>Recording Folder. You’ll be in the Memory Selection menu and you’ll need to choose between Built-In Memory or SD Card. Use the Play button to make your choice and then set your recording folder in the menu that opens up.
Finally, let’s talk about file naming. By default, your files will be named as YYMMDD-HHMM.mp3 or .wav: recording year, month, day and time. The time of day (HHMM) uses the 24 hour clock. You cannot change or set the name of your audio recordings on the Sony ICD-ux560. But you can using your computer.
And that’s what I suggest you do. After transferring the recording to your computer, take a moment and change the file name to a more meaningful name. I always cringe when a researcher shares their audio recordings for transcription and they are named “181114_0052.mp3, 181114_0055.mp3…”: they are in for a rough ride.
To summarize:
- Connect the Sony ICD-ux560 to your computer and create folders, in the REC_FILE folder, that are meaningful to your research project (hint: unit of observation).
- Set the location (internal or external memory) and the recording folder: Settings>Recording Settings>Recording Folder then choose the location and recording folder.
- Once you’ve recorded your interviews/focus group discussions, connect the Sony ICD-UX560 to your computer and rename and transfer your audio recording(s).
2. How to Record LPCM (wav) Audio
I have penned a detailed post on why you should always record your research interviews using the LPCM (wav) audio format. TL,DR: if you need to edit or convert the audio file, you’ll always have pristine quality audio file to work from.
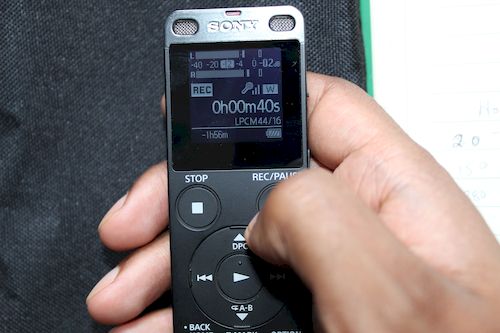
Here’s how you set the Sony ICD-ux560 to use the LPCM format to record your research interviews. Go to Settings>Recording Settings>REC Mode. Use the Up and Down keys to select LPCM 44.1/16bit mode and then press the Play button to confirm your selection. That’s it.
3. How to Set Microphone Sensitivity
On the Sony ICD-ux560, you can use the in-built internal microphone, or connect external microphones, to record your research data. And the quality of your audio recording is going to largely determined by the microphone sensitivity that you use to record your interviews/focus group discussions. It’s crucial that you use the right microphone sensitivity for your recording location and participant(s).
I plan to write a detailed post on how to use the Sony ICD-ux560 peak meters and headphones to meter and monitor your audio recordings for background noise and intelligibility.
The Sony ICD-ux560 has 3 main microphone sensitivity settings; low, medium, and high (there’s also an auto sensitivity setting – which you should never use!). If you are recording using the internal microphones, you also have a choice between wide and focused microphone sensitivity for each of the low, medium and high settings. So you have Low, Low(Wide) and Low(focused) setting, Medium, Medium(Wide)… and so forth. In total 9 different sensitivity settings.
But that’s if you are using the internal microphones. If you are using external microphones, you only have a choice of the Low, Medium, or High microphone sensitivity settings. And the settings you set for the internal microphones are distinct from the setting you use for the external microphones.
To set the microphone sensitivity, go to Settings>Recording Settings> and use the Up and Down keys to select Built-in Microphone sensitivity or Ext. Input Setting for external microphone sensitivity. Press the Play button to enter the respective menu.
The Built-In Microphone Sensitivity menu has 2 choices, For Voice or For Music. Using the Play button, choose the For Voice setting. Now, use the Up and Down buttons to scroll through the Low, Medium, and High settings and the Forward and Backward buttons to scroll through the Wide or Focused settings. And use the Play button to set the microphone sensitivity setting.
The External Input Setting menu has 2 choices, Mic In and Audio In. You’ll need to select and use the Mic In setting when you plug in an external microphone into the 3.5mm mic input jack. If you plug in a 3.5mm male to male cable into mic input jack to record audio from another device, you need to select and use the Audio IN setting. The Audio In setting does not have mic sensitivity settings, since you’re not using a microphone, but you’ll have a choice of using the SYNC REC (a voice activation function for external devices) or not.
Back to the Mic In, using Up and Down buttons and the Play button, select the Sensitivity Setting below Mic In. You’ll enter the Sensitivity Setting menu, and have a choice of For Voice or For Music. Using the Play button, choose the For Voice setting. Now, use the Up and Down buttons to scroll through the Low, Medium, and High settings and use the Play Button to set the preferred microphone setting.
To summarize:
- You’ll have a choice of 3 main microphone sensitivity settings; low, medium, high, and also wide and focused settings for each main setting.
- To set the internal microphone sensitivity setting, go to Settings>Recording Settings>Built-In Mic Sensitivity>For Voice.
- To set the external microphone sensitivity setting, go to Settings>Recording Settings>Ext. Input Setting>Sensitivity setting>For Voice.
4. How to Select a Recording Filter
The Sony ICD-ux560 comes with 2 recording filters, the NCF and the LCF, that are great for voice recording. Here’s a detailed post on the Noise Cut Filter and the Low Cut Filter. TL,DR; use the NCF filter for voice recordings.
So how do you set the filters on ux560. Go to Settings>Recording Settings>Recording Filter. The recording filter menu has 3 choices: OFF, NCF, and LCF and you can only use one filter at a time. Use the Up and Down buttons to select the appropriate filter and the Play button to set the filter.
Those are the 4 Sony ICD-ux560 how-to’s you should know before you record your first interview or focus group discussion. Before I hit the record button, I have a checklist that I always go through. I check and make sure I have set the recording memory and recording folder I want to use. I also check that I’m set to use LPCM recording format, and have a medium mic sensitivity setting. And finally, that I’ve selected to use the NCF filter.
I’ve found the easiest way to do this is to use the REC Information menu. In the Recording menu, press the OPTION button (bottom right-hand corner of the recorder). At the top of the menu that pops up, is the REC information menu. Press the Play button to select it and use the Up and Down Button to scroll through the setting and make sure you have set them correctly.
If you want to change any of the setting, hit the BACK button (bottom left-hand corner of the recorder) and use the Up and Down buttons to select the appropriate menu. This is an alternative to the Settings>Recording Setting menu.
Finally, if you press the OPTION button while you are recording, you can change the filter and mic sensitivity settings. And that’s a great feature to have when you are metering and monitoring your recordings.
That’s it for this post. If you’ve found it was of use to you, leave a comment below. Also feel free to post any suggestions, comments, or questions. Happy recording.
I bought a Sony ICDUX560BLK on amazon and a mic for it the https://www.amazon.com/gp/product/B073QP48RV/ref=ppx_yo_dt_b_asin_title_o05_s02?ie=UTF8&psc=1.
BUT it detects the mic but records no sound with it. I want a mic that is good enough to record close by birds and such. Any thoughts?
David, have you tried the using the mic with a TRRS to TRS adapter? Because that mic is a TRRS mic and the ux560 accepts TRS mics. Here’s a good post on TRRS and TRS and here are some microphone recommendations. The microphone should have come with a TRRS to TRS adapter, try it out and let me know if it solves the problem.
However, I’d only recommend using a clip on microphone when you are recording a single speaker. So weddings, lectures, conferences, voice overs, dictations etc. Those are the only instances I’d recommend you use a lavaliere microphone. For recording outdoors, or environmental sounds use the in-built microphones. They are surprisingly good. And keep in mind that the ux560 is primarily a voice recorder, so if you plan to primarily use it to record environmental sounds, then it’s probably not the best recorder for your use scenario.
I don’t normally record nature sounds – so I’ve not tested this, but I bet the Zoom H1n is a better recorder for your use scenario than the ux560.
Just my 2 cents…
Regards,
Isaac
I have this setup to record using VOR. I intended to leave it on for weeks and capture ambient sound with time stamps when it recorded. I assumed every time it heard a new sound and started a new recording it would create a new file. It did not. It just added the new recording to the initial recording. When it reached 508.3 MB it just shut off.
Yeah, the VOR feature on the ux560 is poor. I tried to use it and I was disappointed. And wrote a post about my experience using the ux560 VOR feature.